There is a lot of talk about different ways to add a route created on google maps to your handheld GPS. It’s taken a long time but I think I finally have the process down. It’s is a little time consuming but can be worth the effort once you get to ride all of those awesome roads without having to stop at every intersection to check your directions.
After reading the post in RoadRunner magazine titled Getting Google Maps and Garmin to Play NicelyI decided to write up a tutorial about one way I transfer routes to my Garmin 60csx since the author was using the same equipment I was.
Create your route using google maps
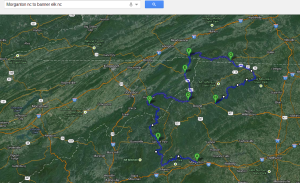
If you are not familiar with creating your own route using google maps there are plenty of tutorials and tips out there to get you started. For the sake of brevity and sticking on topic I’ll let you explore those how-to’s on your own. This little tutorial starts from the point you have your route created like I have below.
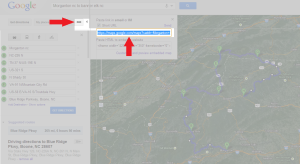
You see that I added a lot of waypoints and dragged the route to include some great looking roads. (Jealous yet?) Creating this route took some time, but part of what I love about travel is planning. Planning a good ride for you and a group is no exception. Now that I am happy with my route I need to create a link to it so that it can be imported in tyre. Click on the link icon and copy the URL
Using Tyre
Tyre is an amazing application that only gets more amazing if you can afford to shell out a few dollars. But in general the free download will do everything we need it to starting with importing a route.
Before we get too far there is one important step that I have no explanation for. We must set up tyre for use with a Tom-Tom gps even though I’m transfering to a Garmin 60 CSX. We do this by clicking Tools->Preferences and once we are in the general tab select the default as Tom-Tom. This setting seems to limit the number of waypoints that are extracted and created in the next step {See Update Below}. The 60csx has a limit of 50 points per route and using this Tom-Tom option it will only extract 100 necessary points. (We’ll trim these out in a later step) Selecting Garmin here imports 1000 points and create an impossible to cleanup route before transferring.
[UPDATE] I found the preference (Tools->Preferences->File Max # of Waypoints -> Set this option to 50
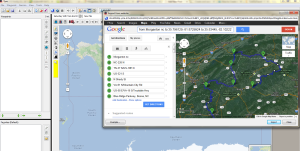
Once you have downloaded and installed tyre for travel click File->Import from website. Paste the URL into the address bar of the new window and press enter. After a few short seconds your route should appear just as it did in your browser. Here you can continue making route changes or just Import (button at the bottm right) the route.
Once you click import you’ll get one last popup that asks what you want to import. For our current purpose click the Route tracks option and then OK. This is when the true magic of tyre happens. Tyre will begin slowly extracting the different points along your route and add them as waypoints. You’ll see the extracted waypoints on the left while it tries to render your route in the main map window.
Trim the route
This step is now useless since I posted my Update
As I mentioned above the Tom-Tom option as the default GPS seems to pull in 100 waypoints. We’ll have to go through these and get rid of half of them. Before we get to editing the route be sure to save it first. I’m a big fan of the GPX format for many reasons, but mostly becase this is the format we’ll need it in to transfer to our GPS. This step is probably the most time consuming and tedious but don’t get frustrated. Here are a few pointers that ensure you don’t get too frustrated or lose the necessary details:
- Do a simple first pass that looks for obvious points that don’t help the route.
- Don’t look to remove all 50 on your first pass
- Locate waypoints that are on the same road with no alternate routes in between
- Keep looking
Send To GPS
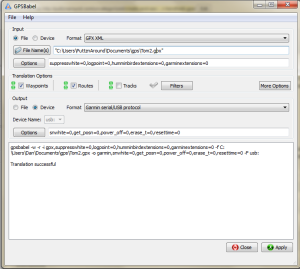
Tyre for some reason doesn’t recognize my garmin device so I can’t send the route directly. What I have do to is use the handy dandy GPS Babel tool to push it to my device. I’m not about to get into all of the great things that this software does but trust me it is a standard for many other applications for interacting with your GPS.
GPSBabel is relatively easy to use. Just keep in mind that we are transferring a FILE to a DEVICE. Select the file that we’ve imported and trimmed down using tyre, then select the format of the output to be Garmin device and select Apply. This should quickly push the route to your device which (on a 60 CSX) can be confirmed by clicking Routes from the main menu. You should see the route (names the same as the file on your machine) located there. If you click it and choose navigate you can confirm all of your hard was was for not. It should create a route the same as the one you created using google maps. (if you didn’t remove too many waypoints)
Tips
- Don’t make your route too detailed
- This is as much about the LENGTH of your trip, but the details and number of route changes
- If need be – break your route into multiple routes
- As with anything – save often.
- Control + Z (undo) can be your friend
- Always confirm the route on your gps afterwards.
- This is so that you can confirm it has no more than the maximum waypoints
- You can confirm your route by scrolling to the bottom of the directions list and look at the total miles. In my case the mileage shown on the device was exactly what it showed on google. Your mileage may vary (pun intended) and it is up to you to determine an acceptable tolerance.


2 comments
Ivan Sims says:
Sep 13, 2013
Good info…
Motorcycle trip planning tools: RoadTrippers.com | Puttz'n Around says:
Sep 20, 2013
[…] RoadTrippers.com is a superb tool allowing you to not only find places you deem interesting, but also create your a route using a familiar google map drag-an-drop interface. Routes can be shared on facebook, twitter, email and saved for review or revising. Downloading the routes it into your GPS is simple also if you follow the guide: Creating and Saving Custom Routes for your handheld GPS. […]